


Transforming Your Space: The Anatomy of a Perfectly Plumed Bathroom Remodel
Embarking on a bathroom remodel is an exciting endeavor that promises a fresh aesthetic and enhanced functionality. Whether you’re revamping a small powder room or completely overhauling a master ensuite, the key to success lies in meticulous planning and execution. From selecting the right fixtures to ensuring impeccable plumbing, every detail matters. Let’s delve into the anatomy of a perfectly plumed bathroom remodel to guide you through this transformative journey.
1. Planning and Design: Setting the Foundation
Before diving into any demolition or construction, comprehensive planning is essential. Consider your specific needs, aesthetic preferences, and budget constraints. Consulting with experienced υδραυλικοι αθηνα can provide valuable insights into the layout possibilities and plumbing requirements. A well-thought-out design ensures that every inch of space is optimized for both visual appeal and practicality.

2. Fixture Selection: Elevating Style and Functionality
Choosing the right fixtures is crucial in achieving a cohesive and functional bathroom design. Each element contributes to the overall ambiance, from luxurious rain showers to sleek faucets and elegant vanity units. Opt for high-quality materials that not only enhance aesthetics but also withstand the test of time. Collaborating with reputable suppliers and plumbers in Athens ensures access to premium products and expert guidance.
3. Plumbing Considerations: Ensuring Seamless Functionality
Behind the scenes, plumbing plays a pivotal role in the success of your bathroom remodel. Proper installation and maintenance are paramount to prevent leaks, water damage, and other plumbing issues. Partnering with skilled plumbers in Athens guarantees precision in pipe fitting, drainage systems, and fixture connections. Prioritize efficiency and reliability to enjoy a hassle-free bathroom experience for years.
4. Lighting and Ventilation: Enhancing Comfort and Ambiance
Lighting and ventilation are often overlooked aspects of bathroom design, yet they significantly impact comfort and ambiance. Incorporate a combination of task, ambient, and natural light to create a well-lit and inviting space. Invest in high-quality ventilation systems to mitigate moisture buildup and prevent mold and mildew growth. Thoughtful consideration of these elements enhances your remodeled bathroom’s aesthetics and functionality.
5. Finishing Touches: Infusing Personality and Charm
The final touches are where your personality truly shines through. Add character and charm to your newly remodeled bathroom with carefully curated accessories, artwork, and textiles. From plush towels to decorative accents, these details elevate the space and make it uniquely yours. Experiment with color palettes, textures, and patterns to create a cohesive design scheme that reflects your personal style.

Conclusion: Crafting Your Dream Bathroom
A perfectly plumed bathroom remodel is a labor of love that transforms your space into a sanctuary of style and functionality. By prioritizing meticulous planning, quality craftsmanship, and expert plumbing, you can achieve exceptional results that stand the test of time. Whether you’re embarking on a modest renovation or a full-scale overhaul, the key is to focus on every detail and collaborate with trusted professionals every step. Dedication and creativity can turn your vision of the perfect bathroom into a reality.

Elevate Your Space: 5 Steps to Professional Interior Painting
Whether you want to refresh your living room or give your bedroom a makeover, professional interior painting can transform your space. Hiring reliable interior painting services is the first step towards achieving a polished and stylish look. However, you can also take several steps to ensure the process goes smoothly and the results exceed your expectations. This guide’ll explore five essential steps to achieve a professional finish for your interior painting project.
1. Prepare Your Space
Before the painters arrive, take the time to prepare your space. Remove furniture from the room or cover it with plastic sheets to protect it from paint splatter. Clean the walls thoroughly to ensure a smooth and even application of paint. Patch any holes or cracks with a suitable filler and sand the surfaces for a flawless finish. Proper preparation sets the foundation for a professional-looking paint job.

2. Choose High-Quality Paint and Tools
Investing in high-quality paint and tools is crucial for achieving a professional result. Consult with your chosen interior painting services provider to select the right type and color of paint for your project. Quality brushes, rollers, and painter’s tape are essential to a smooth and precise application. Cutting corners on materials may compromise the overall appearance and durability of the paint job.
3. Prime the Surfaces
Priming is a step often overlooked by DIY enthusiasts, but it plays a key role in achieving a professional finish. Primer helps the paint adhere better to the surfaces, providing a more even and long-lasting result. Additionally, using a tinted primer can enhance the vibrancy and depth of the final paint color. Consult your painting services professional to determine the appropriate primer for your surface and paint type.
4. Follow Proper Painting Techniques
Professional painters adhere to specific techniques to achieve a flawless finish. Start by cutting in around the edges of the walls and corners with a high-quality brush. Once the edges are defined, use a roller for the larger surfaces to ensure an even coat of paint. Work in small sections and maintain a wet edge to prevent visible brush or roller marks. Consistent and deliberate strokes contribute to a polished and professional appearance.
5. Allow for Adequate Drying Time
Patience is key to achieving a professional-looking interior paint job. Allow each coat of paint to dry thoroughly before applying the next. Rushing the drying process can result in uneven coverage and a less durable finish. Follow the manufacturer’s recommendations for drying times between coats, and be mindful of environmental factors like humidity, which can affect the drying process.

By following these five steps, you can contribute to the success of your interior painting project and collaborate effectively with your chosen interior painting services. Transform your living spaces into personalized havens with a professional finish that reflects your style and attention to detail.
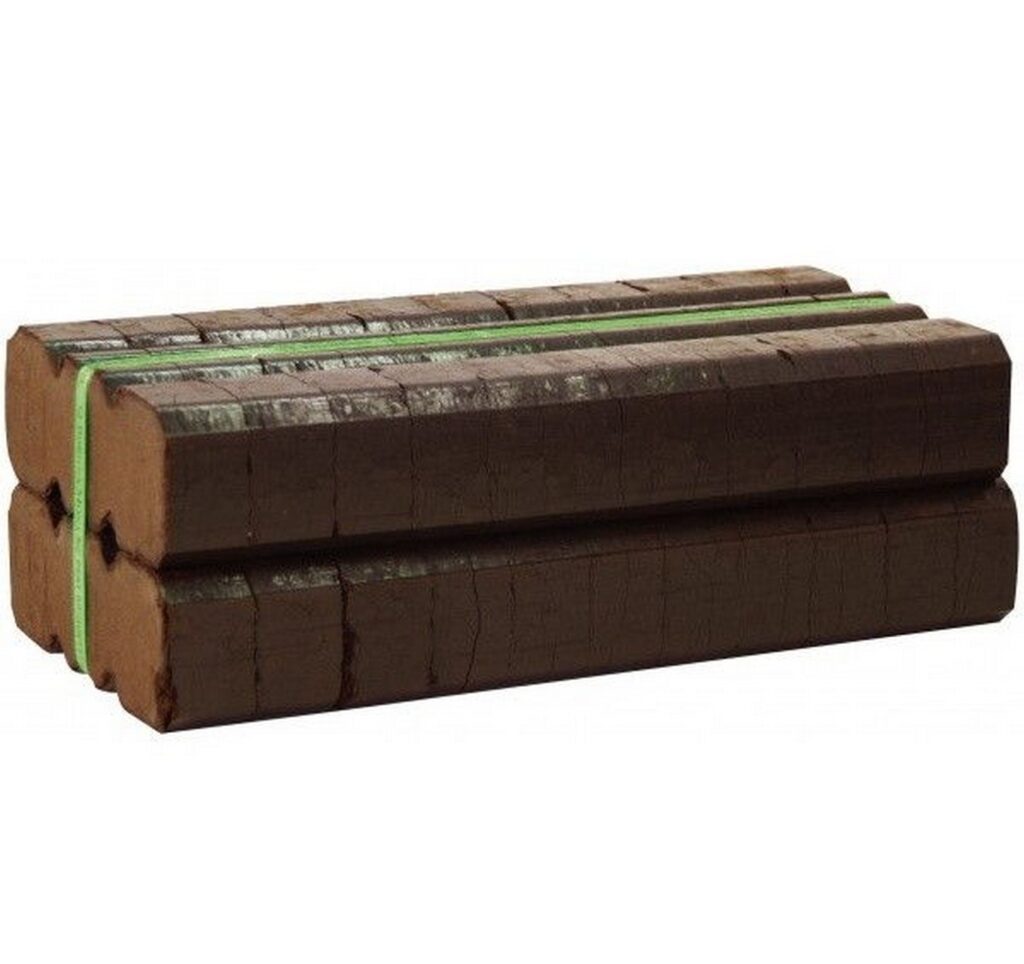
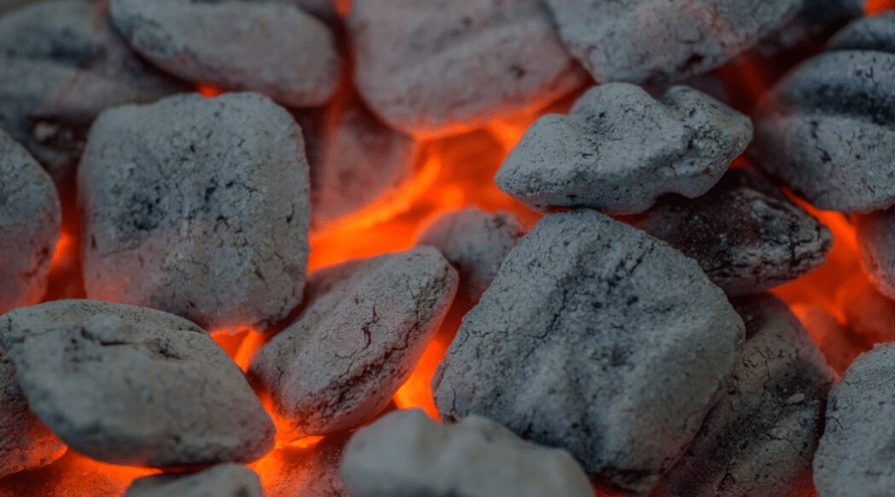
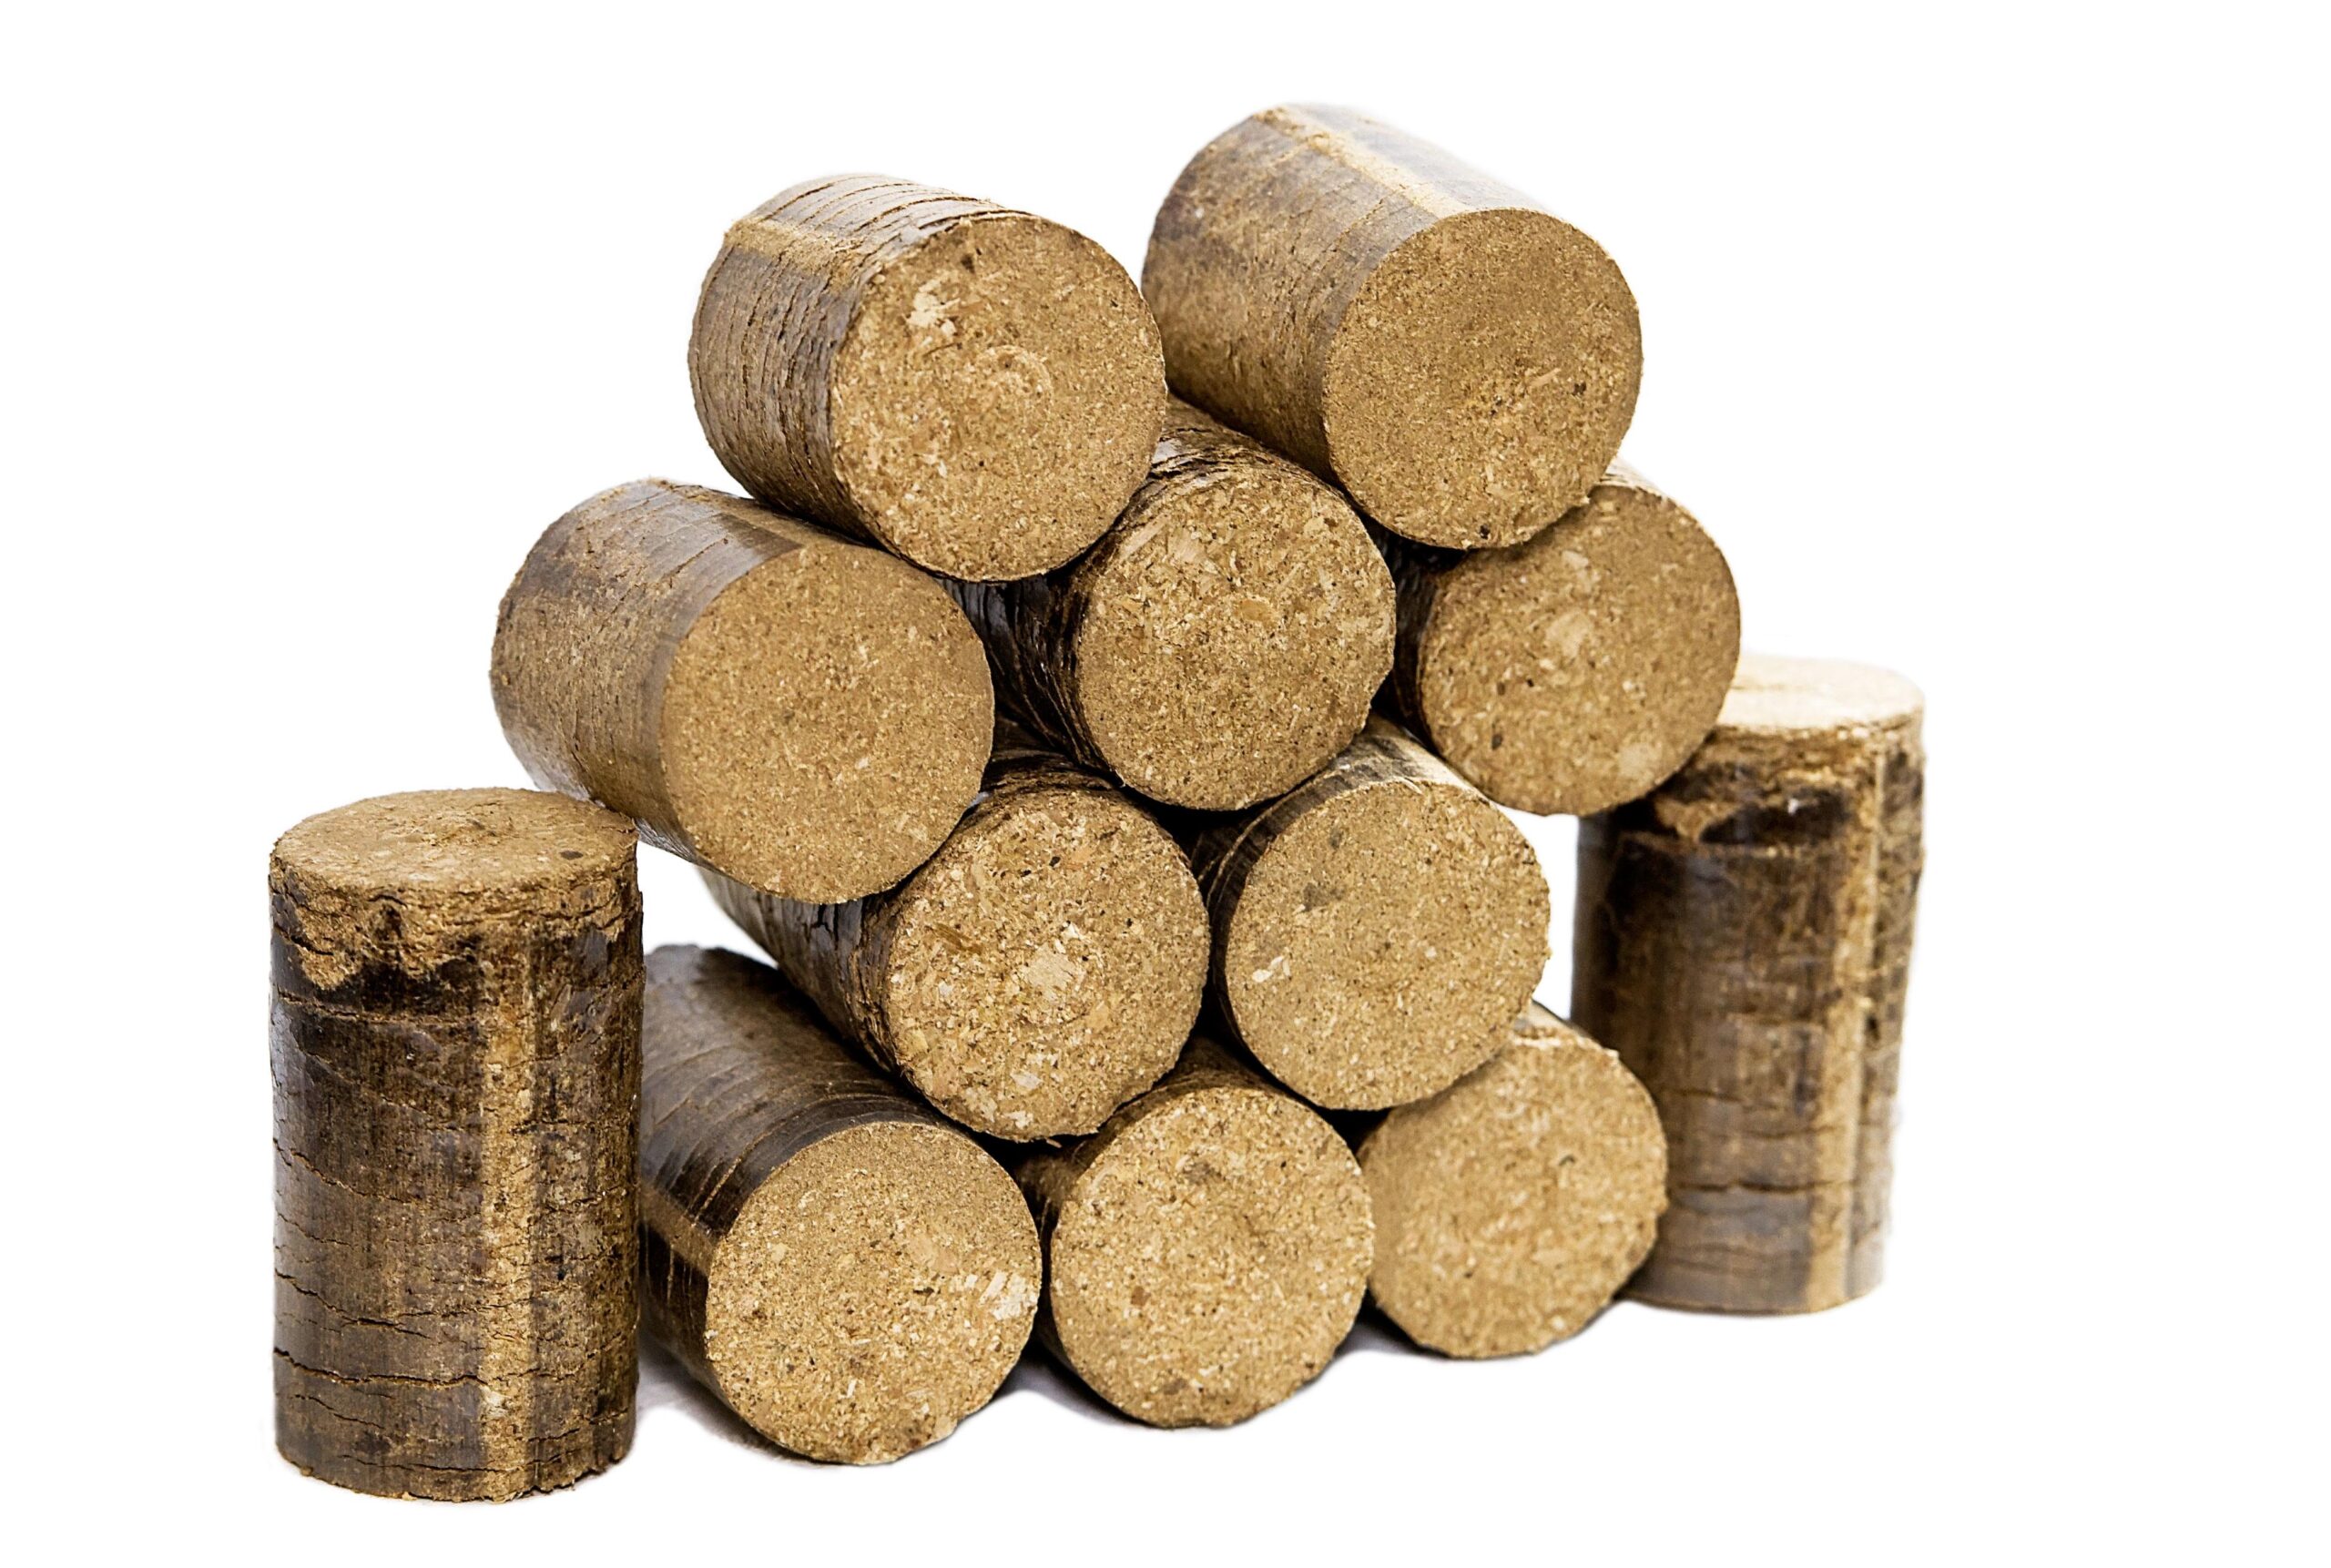
The Relationship Between Briquettes And Air Quality
Briquettes have become a popular alternative to traditional fuels in recent years, promising an eco-friendly and sustainable solution for various heating and cooking needs. These compressed blocks of biomass or coal dust are known for their efficiency and reduced emissions compared to conventional fuels like firewood or coal. However, as we delve deeper into the world of brikett, it’s essential to explore the intricate relationship between these eco-friendly alternatives and air quality.
Understanding Briquettes
Briquettes are an eco-conscious solution to address the increasing environmental concerns associated with traditional fuel sources. Made from various organic materials such as wood chips, sawdust, agricultural residues, and even coal dust, these compacted energy sources are designed to burn cleaner and more efficiently. The production process typically involves compressing these materials into solid blocks without the need for binders or additives. This manufacturing method not only reduces waste but also minimizes harmful emissions.
The Impact on Air Quality
- Reduced Smoke Emissions
One of the key benefits of using briquettes is their ability to produce significantly less smoke when burned. Traditional fuels like firewood release copious amounts of smoke, which can contain harmful pollutants such as particulate matter (PM2.5 and PM10) and volatile organic compounds (VOCs). In contrast, briquettes burn with a cleaner and more controlled combustion process, reducing harmful smoke emissions. This results in improved indoor and outdoor air quality, especially in regions where solid fuels are the primary energy source for heating and cooking.
- Lower Greenhouse Gas Emissions
Briquettes also contribute to the reduction of greenhouse gas emissions, such as carbon dioxide (CO2) and methane (CH4), which are major contributors to climate change. By using biomass-based briquettes, we can harness the energy stored in organic materials while preventing these materials from decomposing and releasing greenhouse gases into the atmosphere. This dual benefit makes briquettes an environmentally friendly choice that aligns with global efforts to combat climate change.
- Minimized Health Risks
Improved air quality resulting from the use of briquettes can have a direct impact on human health. The reduced exposure to harmful smoke and indoor air pollution can help prevent respiratory illnesses, particularly among vulnerable populations such as women and children who often spend more time near open fires or traditional stoves. By opting for briquettes, households can reduce the risk of ailments like asthma, bronchitis, and lung infections.
- Enhanced Efficiency
Briquettes are designed to burn more efficiently, ensuring that a higher percentage of the energy generated is used for heating or cooking. This efficiency reduces the need for excessive fuel consumption, ultimately leading to lower emissions and less strain on natural resources. As a result, the overall environmental footprint of briquette usage is significantly smaller compared to conventional fuels.

Conclusion
In conclusion, the relationship between briquettes and air quality is undeniably positive. These compacted energy sources offer an eco-friendly alternative to traditional fuels by reducing smoke emissions, lowering greenhouse gas outputs, minimizing health risks, and enhancing overall efficiency. As the world strives for cleaner and more sustainable energy solutions, briquettes emerge as a promising option that can significantly improve both indoor and outdoor air quality. By making informed choices and adopting briquette technology, we can take a significant step towards a cleaner, healthier, and more sustainable future.

A Warm Investment: Maintenance Guide for Long-Lasting Pellet Stoves
In recent years, the pelletite müük has surged as people are increasingly turning to eco-friendly and cost-effective heating solutions. One such solution is the pellet stove, known for its efficiency and sustainability. If you’ve invested in a pellet stove, you’re already reaping the benefits of lower heating costs and reduced environmental impact. However, to ensure your pellet stove continues to perform optimally for years to come, proper maintenance is key. In this guide, we’ll walk you through the essential steps to keep your pellet stove running smoothly.
1. Regular Cleaning is Essential
Regular cleaning is one of the most crucial aspects of maintaining a pellet stove. The combustion chamber, ash pan, and exhaust pipe should be cleaned on a weekly basis during the heating season. Excess ash can reduce the stove’s efficiency and even lead to malfunctions. A clean stove will burn fuel more efficiently and produce less creosote buildup in the chimney, reducing the risk of chimney fires.
2. Inspect and Replace Gaskets
The gaskets in your pellet stove play a vital role in sealing the combustion chamber and ensuring proper airflow. Over time, these gaskets can wear out or become damaged. Inspect them regularly and replace any that show signs of wear or deterioration. This will help maintain the stove’s efficiency and prevent heat loss.
3. Check and Clean the Ventilation System
The ventilation system of your pellet stove is responsible for drawing in air for combustion and expelling exhaust gases. Ensure that both the intake and exhaust pipes are free from obstructions, such as debris or nests. Regularly inspect and clean these components to prevent any hindrance to airflow.
4. Lubricate Moving Parts
To keep your pellet stove operating smoothly, it’s essential to lubricate moving parts like motors, fans, and augers. Consult your stove’s manual for specific instructions on which parts require lubrication and how often. Using the recommended lubricants will extend the lifespan of these components and reduce wear and tear.
5. Monitor the Pellet Supply
Proper maintenance also involves keeping an eye on the pellet supply. Make sure the pellet hopper remains clean and free from moisture, which can cause pellets to clump and lead to feeding problems. Additionally, store your pellets in a dry place to prevent moisture absorption, which can affect their combustion quality.

6. Schedule Professional Inspections
While regular maintenance tasks can go a long way in ensuring the longevity of your pellet stove, it’s wise to schedule professional inspections at least once a year. A trained technician can identify potential issues, clean hard-to-reach areas, and make any necessary adjustments to keep your stove operating efficiently.
7. Monitor the Flame Quality
Keep an eye on the quality of the flame your pellet stove produces. A steady, blue flame is a good indicator of efficient combustion. If you notice a yellow or orange flame, it may signify incomplete combustion, which issues like a dirty burn pot or clogged vents could cause.
8. Maintain a Clean Chimney
A clean chimney is essential for safe operation. Schedule chimney cleaning annually to remove creosote buildup, a highly flammable substance that can lead to chimney fires. A professional chimney sweep can also inspect the chimney’s structural integrity and address any issues.
By following these maintenance guidelines, you can ensure that your pellet stove continues to provide efficient and reliable heating for years to come. Regular upkeep not only extends the life of your stove but also contributes to the sale of pellets by reducing fuel consumption and environmental impact. So, stay warm, eco-conscious, and worry-free with a well-maintained pellet stove!

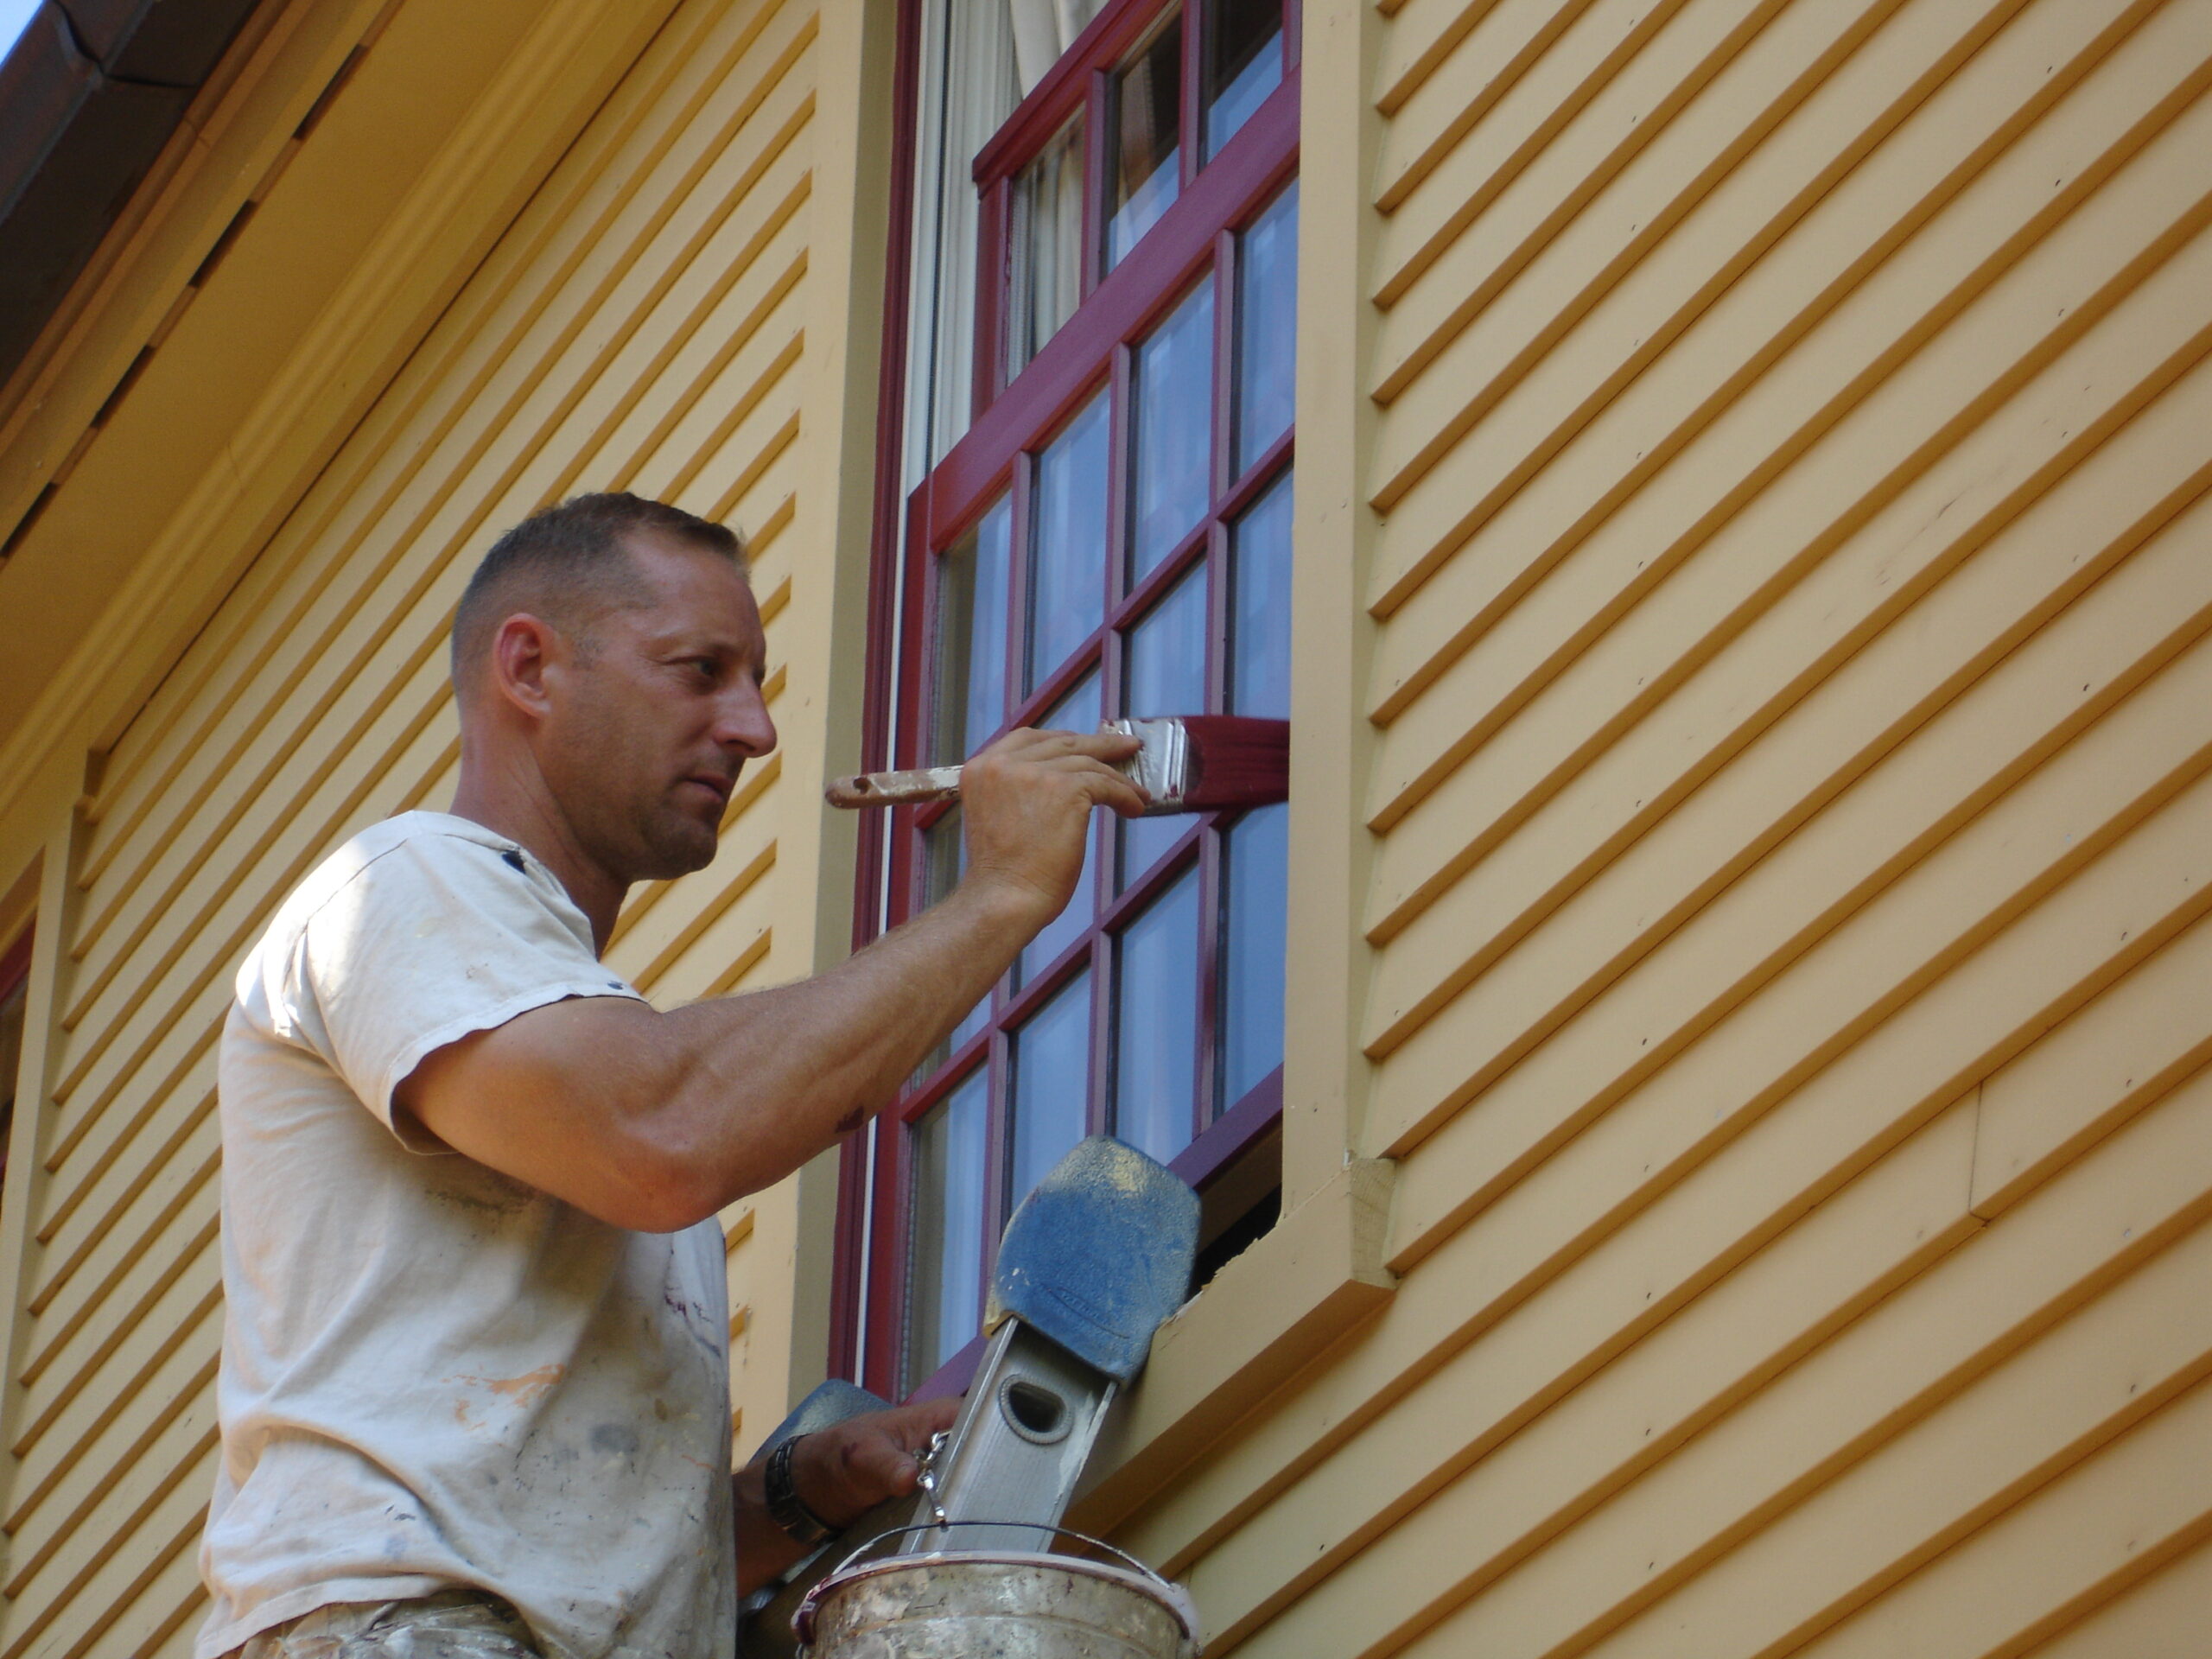
How to Get the Most Out of Your Residential Painting Service
When it comes to transforming the look and feel of your home, few things have the power to make a more significant impact than a fresh coat of paint. Whether you’re looking to revitalize your living space, boost curb appeal, or enhance the overall ambiance of your home, hiring professional interior painting services can be a game-changer. In this guide, we will walk you through the steps to ensure you get the most out of your residential painting service so that you can enjoy a beautifully rejuvenated home.

Plan and Prepare:
The first step in maximizing the benefits of your residential painting service is careful planning. Take the time to decide on the color scheme, finish, and area you want to paint. Create a checklist and determine whether any repairs or surface preparations are needed. Proper planning ensures a smooth and efficient painting, resulting in a more polished final look.
Choose the Right Colors:
Selecting the perfect colors for your interior can be a daunting task. It’s essential to consider your personal preferences, the style of your home, and the mood you want to create in each room. Consult with a professional painter or a color specialist if you need clarification. They can provide valuable insights and even offer color samples to help you make an informed decision.
Hire Professional Interior Painting Services:
Hiring a reputable residential painting service is one of the most critical factors in achieving a stunning result. Professional painters have the experience, skills, and tools necessary to deliver high-quality work. Look for a company with a proven track record, positive customer reviews, and proper licensing and insurance. Request quotes from multiple providers to compare prices and services before choosing.
Quality Paint and Materials:
Don’t cut corners regarding the quality of paint and materials used for your project. Premium paints not only offer better coverage and durability but also provide a more luxurious finish. Discuss paint options with your chosen painting service, and don’t hesitate to invest in superior products for a longer-lasting and visually appealing result.
Prepare Your Space:
Before the painting begins, take the time to prepare your space. Remove furniture and belongings from painted rooms to protect them from accidental spills and splatters. Cover floors and fixtures with drop cloths or plastic sheeting. A well-prepared workspace ensures the safety of your property and a more efficient painting process.
Regular Communication:
Maintain open and regular communication with your chosen painting service throughout the project. Discuss any concerns, changes, or special requests promptly. Effective communication ensures that the painters understand your vision and can adjust as needed to meet your expectations.
Inspect the Finished Work:
Once the painting is complete, take your time moving your furniture back in. Take the time to inspect the finished work closely. Look for any imperfections or areas that may need touch-ups. A professional painting service will happily address any issues and ensure your complete satisfaction.
By following these steps and investing in professional interior painting services, you can unlock the true potential of your home. A fresh coat of paint can breathe new life into your living space, enhancing its beauty and comfort. So, whether you’re preparing to sell your home or want to enjoy a fresh, updated look, a residential painting service can make a world of difference.